Using the Blender glTF Exporter
Note: The following documentation assumes you are using the latest stable release of Blender. Using older versions or experimental builds of Blender may work, but is not guaranteed.
To ensure you are using the latest release of Blender, look at the top right of Blender's splash screen on startup and make sure it matches the one on the main Blender download page: https://www.blender.org/download/

What things will export to glTF?
Not everything you make in Blender can be exported to the glTF (glb) format. This is constantly changing due to ongoing improvements to the Blender glTF importer/exporter add-on, as well as changes to the glTF file format itself. Generally speaking, you can export models with or without textures and/or vertex colors, models with skeletal armatures, models with shape keys (morphing), and models with animation. Things that will not export properly (unless things change at some point): Blender's particle systems, cached vertex animations (like fluid or cloth simulations), and certain types of shaders, to name a few.
If you have questions or problems getting certain parts of your Blender file to export, please refer to the following for more information:
Blender glTF Importer/Exporter Github repository
How to make sure your Blender model(s) export correctly
There are a few things to check to make sure what you see in Blender is what you'll get in Spoke and Hubs. This is not an exhaustive list, but it contains some common things that can cause unexpected results.
+ The scale should read 1, 1, 1.
It's easy to scale things in Blender and then forget to apply that scale (CTRL+a). If your object's scale reads something other than 1, 1, 1 then you can end up with an exported model that doesn't match the size or proportion you expected. One way to avoid this common pitfall is to do all your scaling while in Edit mode. Scaling in Edit mode doesn't alter the object scale values.
+ Object should be at or near the world origin (0, 0, 0)
Not having your object near the origin of the world is a very common problem with models that come from third party sites like Sketchfab or Google Poly, especially if they are animated. You can tell you're having this problem when your model gets dropped into Hubs and it is far from where the loading cube was located.
+ Apply any modifiers that you want to see
Blender modifiers need to be applied in order for them to show up on your exported model. For example, a character that was made by modeling one half, then adding a 'Mirror' modifier to duplicate the other side will only export the modeled half unless you first Apply that 'Mirror' modifier. If you do not wish to commit to applying that modifier because you are still iterating on your design, you may want to simply duplicate the model first, apply the Mirror, then export just that duplicate. *Note: There is a setting in the glTF exporter to 'Apply Modifiers' upon export. However, this applies all modifiers including Armature modifiers (for skinning to a skeleton) which may not be desirable.*
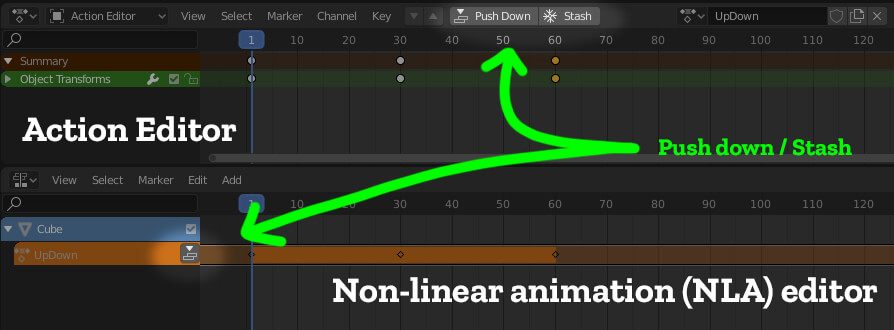
+ Objects with animation tracks need to have those tracks 'Stashed'
In order to support objects with multiple animations, any and all animation tracks need to first be 'Stashed' or 'Pushed Down' for them to export to glTF. It can be performed from either the Action Editor or the NLA (Non-linear animation) editor:

+ glTF & glb are the same-- but not exactly.
TL;DR: When exporting, you'll want to make sure you're exporting as a .glb. Spoke and Hubs expect you to use .glb files. A single .glb file contains all mesh data, image textures, and related information packed into a single binary file. Glb files are generally easier to deal with because you're not having to move around separate .bin and texture files. For advanced users, you might choose to export as glTF if you intend to edit the file by hand using a text editor. There are several converters available to convert a glTF to a glb and vice-versa. Refer to the glTF file format overview for more information.
+ Understanding the Exporter Settings
There are quite a few settings to understand in the glTF exporter, but fortunately, they are divided into sections to make it a little easier. In many cases, the defaults work just fine. However, there are a few worth noting when troubleshooting:
- (Include) 'Selected Objects' - Checking this allows you to only export the selected items you want. It's easy to forget this is turned on--(and even easier to forget to select things first!)
- (Include) 'Custom Properties' - This one is necessary if you're using things like the custom Hubs comoponents add-on (more on this later) but in most cases is not necessary.
- (Geometry) 'Apply Modifiers' - See info above. In most cases you'll want to leave this OFF.
- (Geometry) 'UVs, Normals, Tangents' - Best left ON. There may be unusual cases where you don't want these but it would be rare.
- (Geometry) 'Vertex Colors' - If you choose to paint vertex colors on your model, which can be a cheap, fast way of applying basic color instead of a texture, you'll need this ON. Otherwise, you can turn it OFF with no apparent effect.
- (Geometry) 'Materials' - Pretty much all models require materials to display properly so you will need this ON.
- (Geometry) 'Compression' - This might seem like a good idea, but as of this writing, Hubs does not support objects with Google Draco mesh compression. Leave this OFF.
- (Animation) 'Limit to Playback Range' - Make sure your playback range is set properly to see the full animation get exported.
- (Animation) 'Always Sample Animations' - This one has been found to significantly increase the file size in some cases. Try turning this OFF. If your animation(s) still work without it, leave it OFF.
- (Animation) 'NLA Strips' - You must have this ON if you've stashed a bunch of animation tracks on your object(s).
- Shape Keys - You must have this turned ON if you have an object that requires shape keys (also known as morph targets or blend shapes in other software).
- (Shape Keys) 'Shape Key Normals' - This one can be turned OFF as long as your morphs don't do anything special with the object's normals. If you see odd shading occur when the morphs happen, try toggling this.
- Skinning - You must have this turned ON if your object is bound to a skeletal armature.
Setting up materials that Spoke and Hubs will display correctly
Blender's documentation has all of the latest information about how materials should be configured for glTF. This information can be found easily by searching for 'glTF' in their docs. Here's the link to Blender's glTF documentation
Instead of repeating that information, here are some helpful tips:
+ Whenever possible, use 'unlit' materials
While 'unlit' is a somewhat confusing name, it refers to materials where the lights within the scene have no effect on the object(s). In other words, they appear fully lit on their own. Unlit materials are the 'cheapest' materials to render and look the same on all devices. For this reason, many times people will 'bake' the lighting and shadow information into the baseColor texture first, then apply it to an unlit material. The Blender manual mentions how to make an unlit shader graph, but it's not particularly obvious.
Part of why this is difficult is because you must use the 'Background' node in your shader graph--but the 'Background' node is not listed with all the other nodes by default. Instead, you must find that node by switching the Shader editor to 'World' mode, then copy/paste it into your object's shader graph. You can add it to your Quick Favorites menu to make it easy to find later:
Once you have the Background node, you can plug your texture into it, and send that to the Material Output. When you export to glb and bring the object into Spoke or Hubs, it will be 'unlit' (or fully lit, depending how you think of it.)
An Unlit material is the best type to use for a 'sky dome' since it will not be affected by any scene lights. Generally speaking, if your object doesn't require specular highlights or surfaces that change their look based on lighting, use an unlit material.

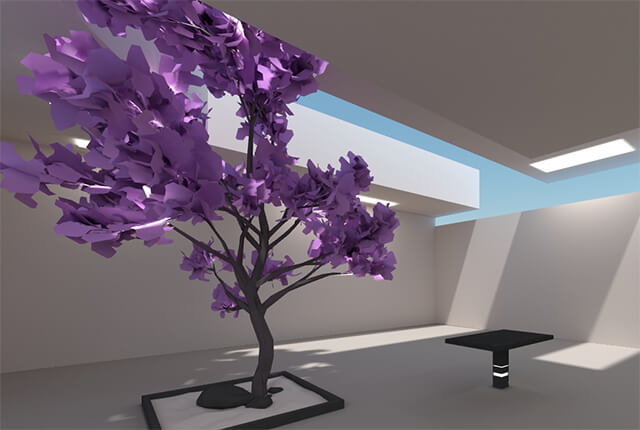
The scene above had all its lighting baked in Blender, then exported with unlit materials. Putting lights in this scene would have no effect on the room itself, but it looks great (and the same) on all devices.