Advanced Avatar Customization
Advanced Re-skinning
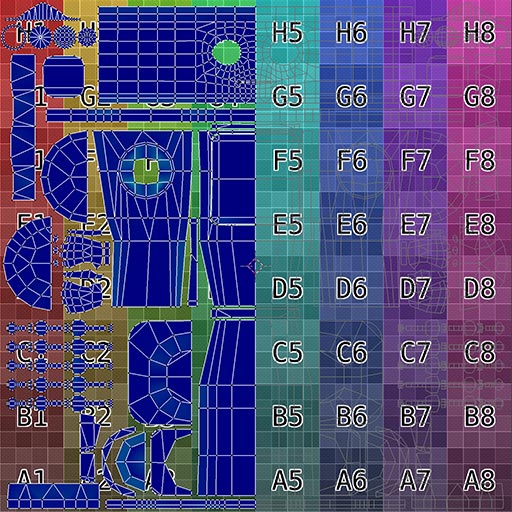
As described in the creating custom avatars page, the most straightforward way to customize an avatar for Hubs is to upload a custom texture set. The simplest version of re-skinning the robot avatar would be to simply paint a 'baseColor' map.
For more advanced customization, you can use the following resources:
- Photoshop PSD Templates - Photoshop templates for a custom Hubs base color skin. You can also use Photoshop's 3D painting tools, using the Robot OBJ/MAT file.
- Substance Painter Project- Full Substance Painter projects for advanced custom skinning. You can also download and modify any of our example texture sets.

The UV layout for the base robot avatar is purposefully symmetrical along the X (horizontal) axis. This makes it relatively easy to paint one half of the texture(s) and flip it to the other side. Some image editing applications such as Photoshop have built-in mirroring tools that allow you to paint both halves in real time.

Types of Texture Maps
Because Hubs uses glTF standards it supports many of the map types associated with physically-based materials. The default avatar uses:
- Base Color - The main design / color map for the texture
- Emissive - Which parts should glow (emit light)
- Normal - How light should reflect off the texture
- ORM - Metallic, roughness, and occlusion
NOTE: 'ORM' texture is composed of Ambient Occlusion, Roughness(black = glossy, white = rough), and Metallic (black = non-metal, white = fully metallic) combined in one singular image with each texture occupying the Red, Green, and Blue channels respectively.
It is highly recommended that texture resolution be kept at 1024x1024 or below. This is mostly due to Hubs being a web-based application where large download times for bigger files can hurt performance, especially on mobile devices. All textures MUST be powers of 2 (64, 128, 256, 512, etc.)
![]()
When you upload textures into Hubs The preview will be updated. You do not need to include all textures - any combination of maps are supported. Each of the slots listed handle a different texture type. You can learn more about different types of maps here.
Create Your Own Avatar
To customize your avatar's shape, you can modify our basic robot template, or upload a .glb file of your choice. If you use the robot template, your avatar will have hands and a body and a head that grows/shrinks when you speak. If you use a plain .glb file, this item is considered the head of the avatar and the whole object will grow and shrink when you speak.
Modify Base Robot Template
We offer the following resources if you'd like to modify our base Robot avatar:
Blender Source Files are available of our Robot avatar. For specific information about how to use these .blend files, be sure to check out the readme within the Blender/AvatarBot folder.
Exported GLBs/Exported OBJ are available if you'd like to bring them into your editor of choice.
We recommend using Blender 2.83 (or whatever the most recent release is) for custom models since we have provided example files that you may use as a guide. (Typically, skeleton setup varies between modeling appications which can make importing/exporting skeletons a bit tricky due to unexpected changes in bone rotations, but it is still possible to use something other than Blender.) Note: the .blend files were created with Blender 2.8 due to the built-in glTF exporter. The glTF importer/exporter for Blender is currently in development. Expect some bugs and please report them!
Hubs avatars are meant for VR, which means that you should work in real world units. A typical avatar height is roughly 1.7 meters. Note: This is typically a 'standing height'. The lack of legs shown here is a part of that overall height.
![]()
Files with the suffix _base refer to the most barebones, basic robot avatar template that can be used as a reference when creating new avatar models. Typically, the Blender workflow would be to either 'Link' or 'Append' the objects from AvatarBot_base_for_export.blend in order to use the existing armature (skeleton) and any animations that go along with it, using them as a basis for your own model that you would attach to it.
The armature is based largely upon the same hierarchy and naming conventions of the skeleton provided by High Fidelity. This also happens to have a similar structure to VRChat in terms of bone orientations. However, in our current implementation in Hubs, we have eliminated some of the bones within the hierarchy, namely the lower body and arm joints since we are not using any sort of inverse kinematics (IK) at the moment. This may change in future iterations.
Use a Regular .glb File
You can use any .glb object as an avatar. This could be something you made on your own, or a creative-commons asset from Sketchfab or Google Poly. Sometimes .glb files need a few modifications to work properly as avatars. You may wish to open the object in Blender to fix the object's scale (it should be about 1.7 meters), ensure the object is facing forward, move the object backwards a bit so it doesn't obstruct your view. You might also want to optimize the object using the tips in the optimizing scenes page
Upload your own model
- Enter a Hubs room
- Select the ‘People’ list icon in the top right corner of the screen
- By your name, you will see a pencil icon. Click this icon to open the avatar selection screen
- Click the ‘Browse Avatars’ button
- From here, you can see a list of your own avatars, the first spot should say "Create Avatar"
- In the avatar customization screen choose one of the default body shapes
- Click 'Custom GLB' to upload your 3d model
- Save the avatar